Although it may seem obvious, and you may think that no one can teach you anything about cleaning your Krups, you should pay attention to these tips. The first thing we must do is differentiate between:
- Traditional cleaning. With this, we refer to the cleaning that should be done daily with clean water, a cloth, and, if possible, a medium-sized brush. The Krups bean to cup machines are constantly soiled with coffee grounds and liquid; we cannot allow this to accumulate.
- Automatic cleaning. In this case, we refer to the coffee machine’s cleaning with the help of Krups cleaning tablets. It is advisable to do this cleaning every time the machine asks for it or every 3 months.
- Descaling. Like the previous one, your Krups does all the work with the help of the descaling product we add.
Note: The Krups super automatic machines allow you to activate the auto rinse cycle so that every time you turn on the machine, it does a rinse. In addition to helping clean, it will heat the circuit, and your coffees will come out hotter.
Both the cleaning and descaling processes are intuitive in all models, but so that these simple operations are not a problem, I leave you all the user manuals and a brief explanation of how to do it.
Manual cleaning of a Krups bean to cup machine
Krups super-automatic coffee machines are not the dirtiest on the market, but they must be cleaned often to avoid future problems.
- The grounds container can hold up to 9 extractions pucks. I recommend cleaning it every 5 or 6 extractions maximum, thus minimizing the possibility of condensation from the water in the pucks affecting the internal components of the coffee maker.
- The drip tray has buoys that indicate when it is full. But as in the previous case, it is advisable to clean it continuously; on the one hand, we reduce the possibility of spills, and on the other hand, we increase hygiene and reduce humidity inside the machine.
- Use a dry microfiber cloth to clean the exterior and moving parts. Reserve an exclusive cleaning cloth for your Krups coffee maker so you will always keep it shiny and free of coffee or milk marks.
- Regularly disassemble and clean the milk spout. Unlike coffee residues, milk residues can create bacterial sources and clogs (even worms) in the pipes. At least once a week, run the nozzle under the tap.
Approximately every 3 months, I recommend that you disassemble the top cover of the coffee maker and, with a long brush (or a hand vacuum cleaner), clean all the coffee residue from the outlet of the grinder and the inlet of the brewing unit (piston). Below, you can find the status of a Krups EA81 that I repaired:
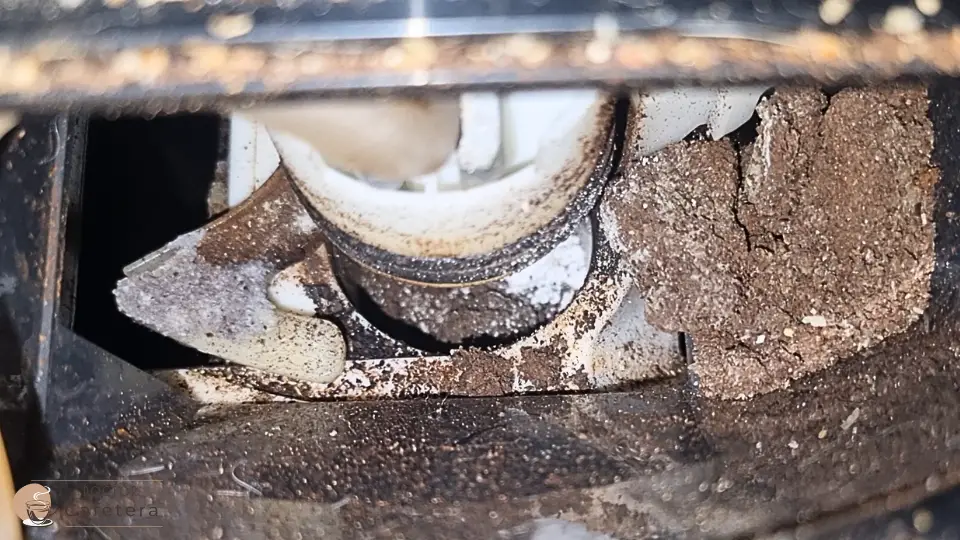
⚠️ Please be aware that failing to clean this area regularly can lead to a deterioration in the flavor of the coffee and may also pose health risks due to the potential ingestion of bacteria and fungi.
Automatic cleaning of a Krups bean to cup coffee machine
- The coffee maker prompts a cleaning after approximately every 300 cups of coffee brewed.
- It’s important to note that while the coffee maker suggests a cleaning cycle, it is not mandatory to execute it immediately.
- The cleaning indicator (or symbol) will remain lit until the cleaning cycle is carried out.
- You will require a Krups cleaning tablet for this process.
- Ensure you have a container with a minimum capacity of 600ml to collect the water.

This procedure may differ slightly between models with a display and those without, but the steps remain the same. The only variation lies in accessing the different process options.
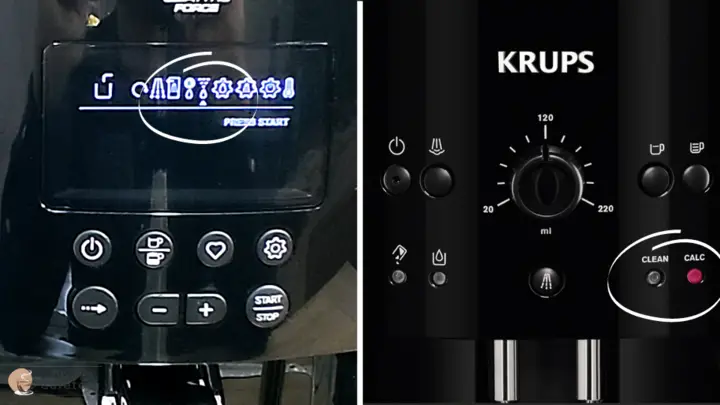
Krups super automatic in cleaning mode with screen and without screen
- When the cleaning light comes on, access the automatic cleaning menu through the settings menu and select the cleaning symbol (drop with K) or press the spray button on models without display.
- Once you press this button, the machine transitions into cleaning mode, guiding you through subsequent actions using its lights/screen.
- First, it will prompt you to take out the coffee grounds container. Please follow this instruction, clean it meticulously, reinsert it to its original position, and the light will turn off.
- Then, remove the drip tray, clean it thoroughly, and put it back in place.
- Now, remove the water reservoir and fill it with clean water.
- Place a 20-ounce (600ml) container under the coffee maker nozzles.
- Remove the top lid of your Krups superautomatic machine and insert a cleaning tablet through the hole.
- Press the spray button again on models without a display or “start” (models with a display).
- In specific models, the cleaning cycle will initiate with its initial 10-minute phase, while in other models, the entire 13-minute cycle will begin.
- On models without a display, the cycle is complete, so remove the container and empty the drip tray, and the cycle is finished. On models with a display, replace the container for 3 more minutes to complete the cycle.
- If the “clean” indicator remains illuminated, press the spray button once more to complete the remaining 3 minutes. Following this, the light will turn off.
📖 Check your Krups coffee machine manual here
Descaling a Krups bean to cup machine
Note: You can only initiate this cycle when prompted by the coffee machine.
- The duration of the cycle is approximately 20 minutes.
- The frequency with which the coffee maker requests descaling varies depending on the hardness of the water you use.
- Even if the coffee maker requests a descaling cycle, it is not mandatory to do so immediately; you can continue using your Krups.
- The “CALC” light or the “descaling symbol” (models with display) will illuminate until the cycle is performed.
- If the coffee maker has a water filter installed, remove it before starting the descaling process.
- You will require a descaler for the next steps. If your coffee maker is still covered by warranty, it is recommended to use the Krups-recommended descaler. However, you can use any alternative descaler or white vinegar if it’s no longer under warranty.
- Additionally, you will require a container with a minimum capacity of 20 ounces (600 ml) to collect the water.
Note: This procedure varies between the models with display and those without, but all the steps are the same. The only variation is in the way to access the different options of the process.
- When the CALC light or cleaning symbol is lit up (on models equipped with a display), navigate to the descaling symbol (spray drop) within the settings menu. For models without a display, simply press the spray button.
- Once you press this button, the machine transitions into descaling mode, guiding you through subsequent actions using its lights/screen.
- Remove the coffee grounds container and clean it thoroughly, putting it back in place.
- Remove the drip tray, clean it thoroughly, and put it back in place.
- Remove the water tank, empty it, and fill it with clean water up to the CALC level, then add the Krups descaler and put it back in place.
- Place a 20-ounce (600ml) container under the coffee maker nozzles.
- Press the spray button again on models without the display or “start” on models with the display.
- The first part of the descaling cycle will now run for 8 minutes.
- After these 8 minutes, remove the water container, clean the drip tray and the coffee grounds container, putting everything back in place.
- Remove the water tank, fill it with clean water, put it back in place, and press “start” or the spray button, depending on your model.
- The second descaling phase will start, which lasts 6 minutes.
- After this phase, remove the water container, empty it, and put it back in place by pressing “start” or the spray button, depending on your model.
- After another 6 minutes, the descaling cycle will be finished.
- Remove the container and clean the coffee grounds container and drip tray thoroughly.
- Refill the reservoir with clean water, and your Krups automatic coffee maker is now ready to brew coffee.
📖 Check your Krups coffee machine manual here
Conclusion
A Krups super-automatic coffee maker is a great investment since it produces exquisite coffees and will work perfectly for many years. However, poor cleaning can do just the opposite; it can cause the coffee maker to break down quickly and the coffee to be horrible.
The first thing to do is to download your model’s manual and read the cleaning and maintenance section. Follow the steps indicated there, plus the tips I give you here, and you will achieve that your Krups will remain as good as new for many years.