Keurig, a pioneering brand in K-Cup coffee pods, has been in the market since 1998, initially serving offices and expanding to homes since 2004, generating sales of over 11.6 billion dollars in the United States.
Their coffee makers are known for their speed and ease of use, but like all small appliances, they sometimes experience issues. In this article, I will address the most common problems and provide useful solutions for each, but before we begin, I recommend downloading the user manual for your specific model.
Why won’t my Keurig turn on?
Sometimes, unexpectedly, your Keurig may stop working. The coffee maker appears completely inert, with no lights on and no sounds being emitted.
All coffee makers on the market have safety measures to protect the user and the machine from potential accidents. Since coffee makers operate with hot water under high pressure, they can be dangerous if something goes wrong, as the water heats up to temperatures of up to 200°F, which could cause severe burns.
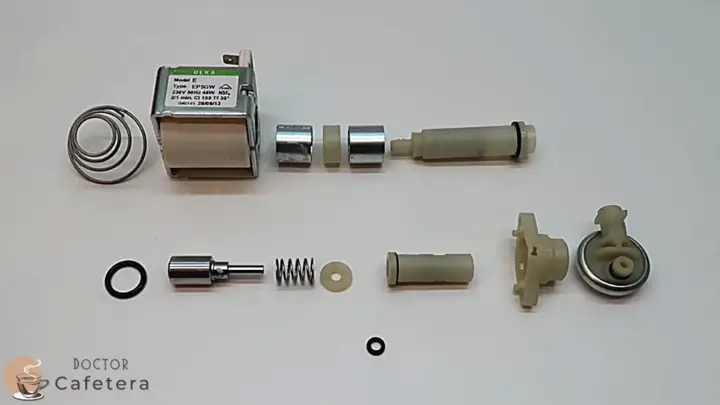
When a Keurig coffee maker’s thermostat (NTC) malfunctions or becomes blocked, the coffee maker stops working. This occurs because, without a functional thermostat, the coffee maker cannot regulate the water heating, posing a potential risk.
“NTC” stands for Negative Temperature Coefficient. In electronics and temperature sensing, an NTC thermistor is a type of resistor whose resistance decreases as its temperature increases.
➡️ How to resolve the issue: You need to disassemble the housing of your Keurig coffee maker and locate the thermoblock and thermostat, which have a similar shape to the following:
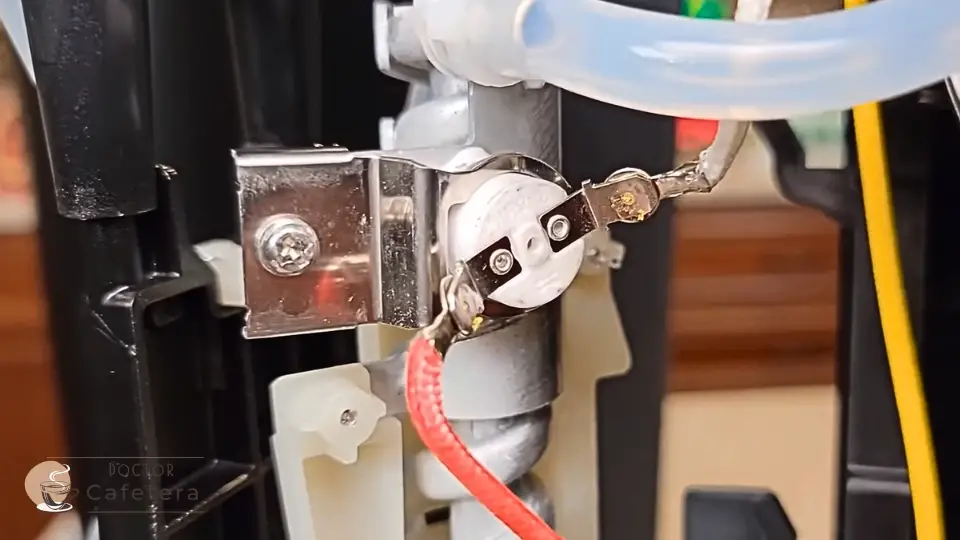
Once you have located the thermostat (NTC), ensure it is not “blocked.” To do this, insert a rigid and sturdy object, such as a paperclip, into the central hole. If it is blocked, you may hear a click that releases the thermostat contacts.
Next, you can measure the continuity between the two connections in the image above. If the thermostat is in good condition, it will show continuity. However, if damaged, it will not show continuity, indicating that you must purchase and replace a new one.
Keurig coffee maker, not brewing coffee
The most common issue with these coffee pod machines is the obstruction of the water circuit due to the accumulation of residue and limescale. Fortunately, this problem can be quickly and effectively resolved if you clean your Keurig thoroughly.
Are you aware that the coffee maker is one of the household appliances that tends to accumulate the most dirt? Typically, people enjoy their coffee in the morning when they wake up or need an energy boost. However, we often forget to clean the coffee maker after use; in most cases, we even leave the coffee pod inside.
How to clean a Keurig machine
Accumulation of residue in your Keurig is something that can happen over time. It’s recommended to clean the exterior of your coffee maker at least once a week and perform a deeper cleaning one or two times a year (descaling, which I’ll discuss later).
✅ I hope these steps for cleaning the exterior of your Keurig coffee maker are helpful for you:
- Turn off the Keurig and unplug it from the electrical power source.
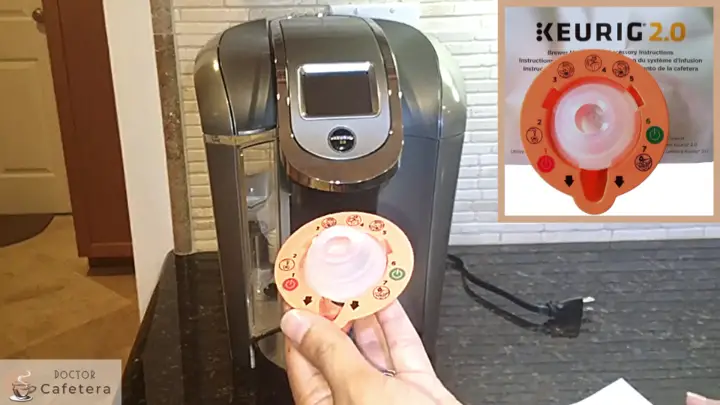
- If you have a Keurig 2.0, you can use the injector cleaner that comes with the machine. If you have an older model, you can use a sewing needle.
- Remove the coffee pod holder and the tray underneath it. Wash both pieces with water and dish soap, using a toothbrush or a baby bottle cleaner if necessary.
- Take out the water reservoir and clean it thoroughly with water and dishwashing soap. Make sure not to use a sponge that may scratch the plastic of the reservoir, as this material is prone to scratching easily.
- Remove the drip tray and wash it under the tap in the same manner as the previous pieces.
- Use a damp microfiber cloth to gently clean the entire exterior of the coffee maker, ensuring you remove any coffee residue.
- Dry each piece thoroughly and reassemble the coffee maker.
How to descale a Keurig coffee maker
Do you know what “descaling” means in a Keurig coffee maker? Many modern coffee makers feature a small display that simplifies operations. “Descaling” means removing limescale from the water circuit.
The initial sign that a Keurig is having problems resulting from mineral and residue buildup is a noticeable alteration in the taste of the coffee, which often becomes unpleasant. In addition, you may notice a reduced amount of coffee per cup, a prolonged delay in brewing coffee, or even colder coffees than usual.
If your Keurig can still brew coffee, you can undertake one or more descaling operations. However, if your coffee maker is not dispensing any coffee, you must dismantle it and examine other potential causes.
It’s important to mention that Keurig did not feature a “descaling mode” until recently. Therefore, we will explore the descaling process for an older Keurig coffee maker and a more modern machine equipped with a descaling mode and light code.
Video on how to descale an older Keurig coffee maker WITHOUT “descaling mode”:
Video on how to descale a Keurig coffee maker WITH the “descaling mode”:
How to reset the descaling message
Sometimes, after performing the descaling process of your Keurig (following the user manual), you may find that the descaling message continues to appear. But don’t worry; there is a simple method to resolve this issue:
- Turn on your Keurig and let it heat up until the descaling message appears.
- Hold down the 8 oz and 10 oz buttons simultaneously for a few seconds until the message disappears.
Following these simple steps, your Keurig should have reset the descaling message successfully.
How to unclog the Keurig nozzle
If none of the above has helped, it’s most likely that the clog in your Keurig is not within the internal pipes, pump, or boiler but rather in the water injector needle. Don’t worry; that’s good news!
Clogged piercing needle
Cleaning the piercing needle is one of the first steps if a Keurig coffee maker isn’t pouring a full cup. If you’ve already done this, skip this step, but if you haven’t, pay attention.
The Keurig’s piercing needle has three cavities to unclog with a thin, straight, and rigid object. Believe it or not, a paperclip is the best tool for this task. Straighten one end of the paperclip so that it can penetrate through the holes in the injector needle.
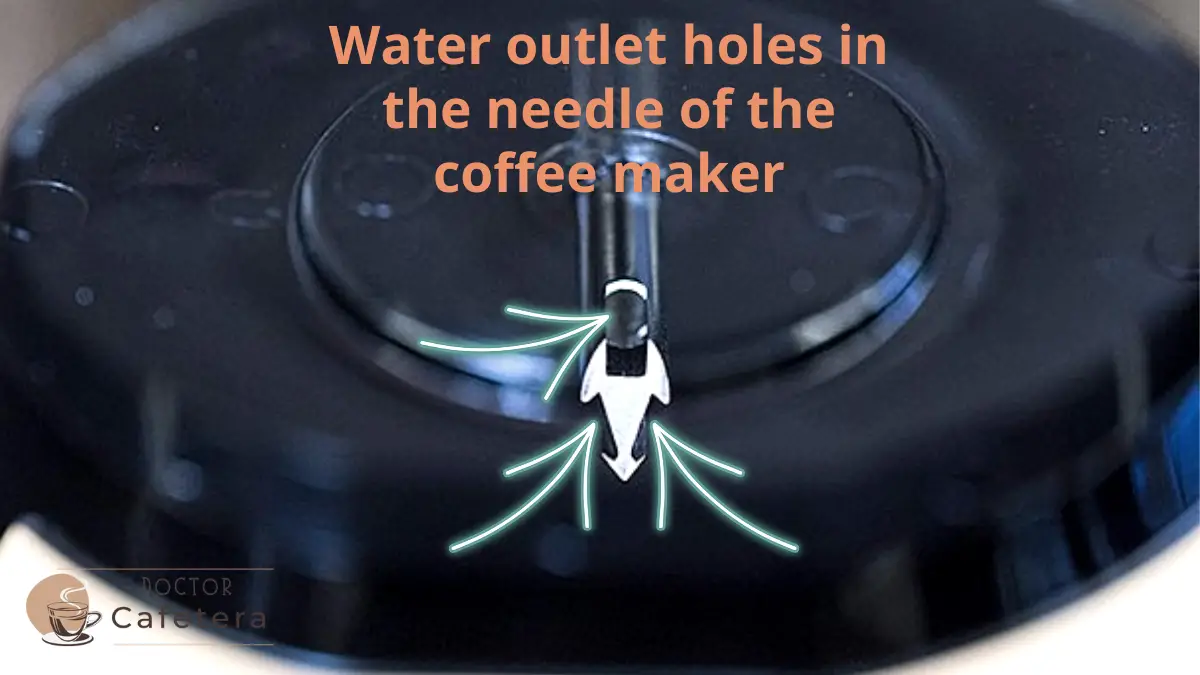
Once you have cleaned the needle, you should try making coffee and check if it flows more smoothly than before. If nothing has changed, the problem lies elsewhere, as we will see next.
Clog in the water reservoir outlet valve
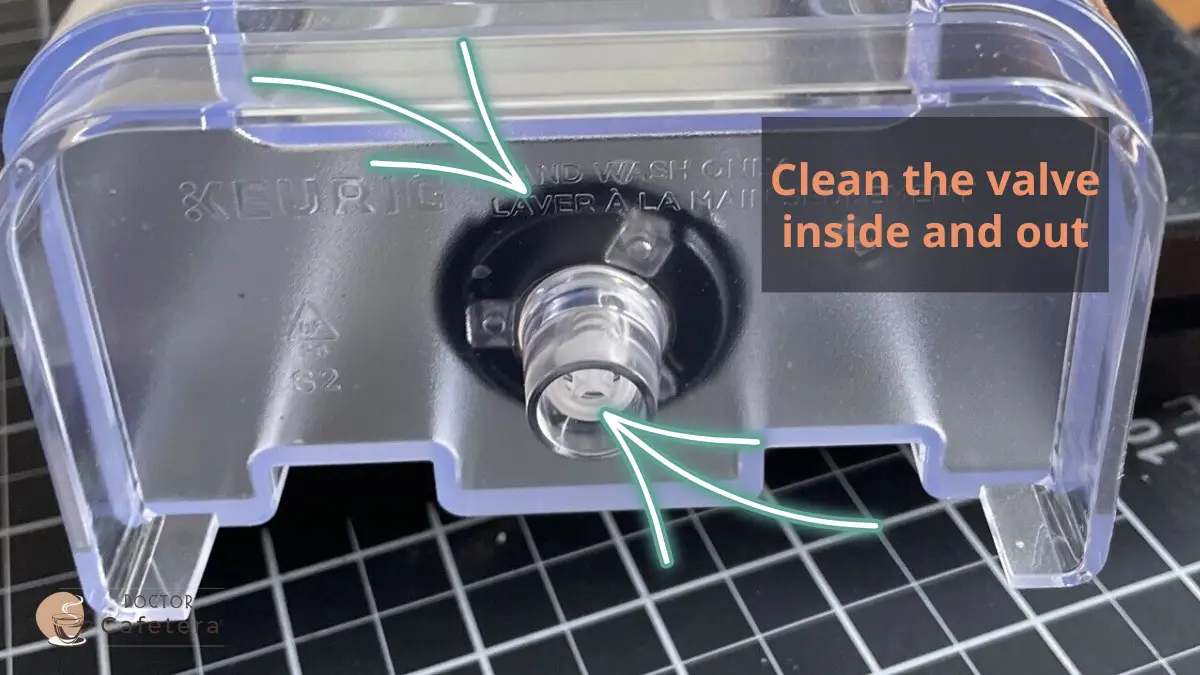
The water reservoir outlet valve is one of the most unsuspected places to find a clog due to dirt. However, it is the entry point for all impurities accumulating in a Keurig machine.
These impurities get trapped in the valve because the water may contain dirt or fall into the reservoir when we haven’t properly closed the lid. Over time, dirt in the valve leads to a clog that manifests as a low volume of coffee being served.
The Keurig machine doesn’t pierce the coffee pods
There are various reasons why a Keurig coffee maker may not pierce the coffee pods correctly. Fortunately, most of the solutions are easy to apply, and in just a few minutes, your coffee maker will be as good as new.
- Dirty or obstructed needle:
- Issue: The coffee maker’s needle may be dirty or clogged.
- Solution: Clean the needle using a cotton swab and alcohol. Ensure complete drying before using the machine.
- Insufficient water in reservoir:
- Issue: Inadequate water in the reservoir leads to insufficient pressure for puncturing.
- Solution: Allow the machine to heat water adequately before use. If the problem persists, check for pump issues.
- Accumulated pressure in the pod holder:
- Issue: Excessive pressure in the pod holder due to too many pods.
- Solution: Remove all pods, reintroduce only one, and, if needed, limit the number of K-cups to one or two.
- Pump malfunction:
- Issue: Potential malfunction in the coffee maker’s pump.
- Solution: If the problem persists without pods, refrain from using the machine and get the pump repaired.
- Residue obstruction:
- Issue: Residue from previous pods obstructing the needle and pod holder.
- Solution: Clean the needle to remove residues. Carefully open and clean the pod holder to eliminate stuck coffee grounds.
- Defective coffee pods:
- Issue: Defective pods with deformities, holes, or tears.
- Solution: Purchase new coffee pods to ensure proper machine function. Consider changing the brand to avoid similar issues.
Keurig coffee maker too noisy
Noise in these coffee makers is usually normal, so don’t be alarmed if your Keurig coffee maker makes strange noises. These types of coffee makers use what’s known as a “vibratory pump,” which has a powerful piston inside responsible for both noise and vibration.
However, in the case of the earlier versions of the B60 model, they were very noisy and vibrated excessively. The following video compares an older Keurig B60 with the same model produced recently:
New Keurig models are manufactured with “Quiet Brew Technology,” indicated on the box. So, before purchasing a new Keurig, it’s an updated model like this one.
Why won’t my Keurig heat water?
If your Keurig stops heating water, as we’ve mentioned before, you should ensure the machine is completely clean and free from any residue that could clog or hinder its proper operation.
But if your coffee maker is clean and still not heating, this issue may indicate that you must pay close attention to the water pump. If it’s not functioning correctly, it will prevent the heating system inside the machine from working properly. If the problem lies with the water pump, you may need to replace it with a new one.
Why is my Keurig leaking?
This issue can be annoying, so in this section, I’ll explain the possible causes of water leaks in Keurig and offer solutions to help you enjoy your coffee again without drips or water leakage.
1. Check the water reservoir
It may seem obvious, but checking the water reservoir when dealing with a leaking Keurig is essential. If the problem originates from the reservoir, you may need to replace it or change some rubber seals.
Make sure the reservoir is correctly placed and securely attached. If you remove it and place it over the sink, you can check for any cracks or damage causing the water leakage. If you determine that the leak doesn’t come from the water reservoir, you should inspect other parts that could also be causing the drip issue.
Note: Ensure all rubber seals are aligned correctly to prevent additional leaks.
2. Water overflow in your Keurig
If you own a Keurig 2.0 Brewing System, Keurig K250, Keurig K350, Keurig K450, Keurig K550, or Keurig K575, you may encounter a water overflow issue from the coffee pod machine´s head. This can happen when the overflow tray of the coffee maker’s head becomes clogged and prevents water from flowing correctly, resulting in a leak.
Fortunately, there is an easy solution if you face this problem. First, remove the K-Cup holder from the machine to access the overflow tray. This tray can be easily taken out.
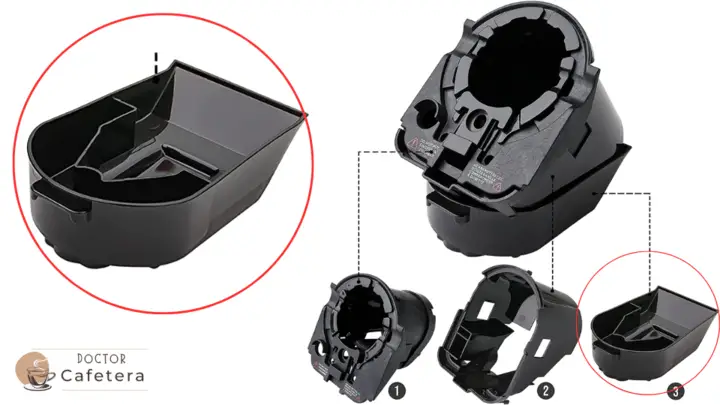
The issue is likely due to the overflow tray filling up with water and getting blocked, which hinders water from flowing effectively to the coffee pod holder. To resolve this, rinse the tray with hot water to clear the blockages.
Once the tray is clean, place it back in its position, ensuring it’s completely dry before using the coffee maker again. This should address the overflow problem and allow your Keurig to function correctly.
3. Water leak from an internal component
The source of the leak could be any component in the water circuit, such as pipes, flow meter, check valves, thermoblock, or any other. Once the leak is confirmed, unplug your Keurig and disassemble it.
To access the internal components of the Keurig, you will need to remove the casings, being careful not to break them. Once the casings are removed, you can carefully plug in the machine and let the water run by pressing the coffee button to determine the source of the leak.
Depending on the issue, you may be able to repair or replace the component responsible for the leak. After completing the repair, reassemble the coffee maker and test it to ensure the leak has been resolved.
Air pump leak
Some Keurig machines may experience an issue with the internal gasket of the air pump, which is responsible for pumping water to the coffee pod. If this happens, water will start to leak through the pump, and you’ll notice water loss at the base of the coffee maker.
To address this problem, you need to disassemble the coffee maker and access the pump to replace it with a new one. It’s essential to note that replacing the pump should be done with extreme care and precision to avoid damaging other components of the coffee maker.
You can watch an example video here:
Check valve leaks
Other Keurig machines may experience water leaks due to plastic components like the check valve in the video below. Vibrations, high temperatures, and humidity are not ideal for keeping plastic parts in good condition for an extended period:
The Keurig won’t brew any coffee
In the more modern models, you may see messages about water overpressure or underpressure on display, with the machine itself stopping the coffee output to protect you from a coffee pod explosion and potential burns.
⚠️ What should you NOT do?
You should never bypass the pressure sensor in coffee makers that warns us about overpressure. Doing so risks your safety, and the coffee you obtain won’t taste good either.
If there is an overpressure message, you should look for the problem instead of bypassing the sensor that displays it. You can easily resolve the issue with the instructions I will provide.
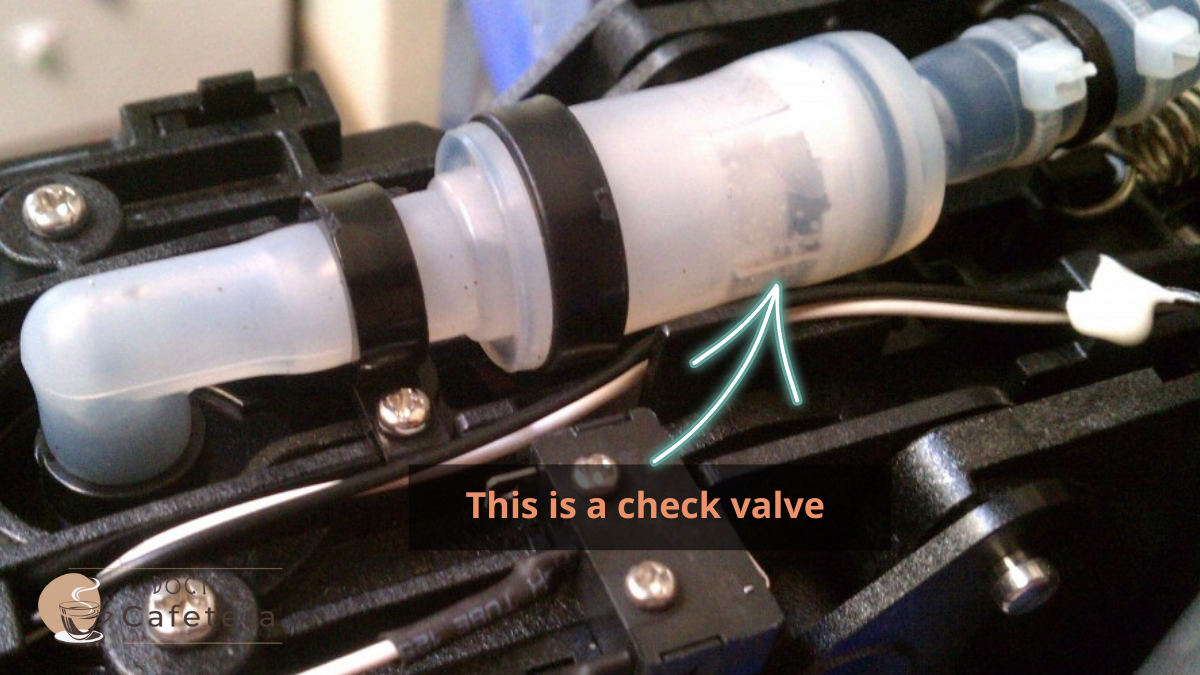
Clogged check valve
Most Keurig coffee makers suffer from a clogged check valve, a non-return valve. Now, you might be wondering what a check valve is. It’s a valve that only allows water to flow in one direction.
This valve prevents coffee grounds and other residues from the coffee brewing process from flowing back into the pump and the heating element. It’s located right behind the piercing needle of the Keurig head. To simplify this concept, let me show you an image:
How do you locate the check valve?
As I mentioned earlier, you need to dismantle the top part of the coffee maker; typically, you’ll see two screws on the inner area of the machine’s head. Once you’ve removed these screws, you can take off the upper casing of the coffee maker, and you’ll be able to access the check valve.
How to unclog the check valve?
To unclog this valve, you have two options. On the one hand, you can press on the sides of this valve with your fingers to release it; on the other hand, you can remove the plastic ties and clean the valve under running water. In essence, you need to eliminate any blockage inside.
Clogged Keurig flow meter
If you’ve already checked all of the above, but your Keurig coffee maker still isn’t brewing coffee, ensure the flow meter is not clogged. Locate it at the water reservoir outlet inside the coffee maker, remove it, clean its interior, and reattach it.
Clogged or faulty Keurig water pump
This is the extreme case where a Keurig coffee maker doesn’t dispense coffee. When the pump is clogged with limescale, carefully dismantle it, clean each component, and reassemble it.
My Keurig is brewing too much coffee
If your Keurig is preparing more coffee than it should, first, check that the water reservoir is securely in place and that all parts of the coffee maker are properly aligned.
If the issue persists, turn off, unplug the machine, and carefully clean the outlet needles, as described earlier.
How to reset a Keurig coffee maker
Sometimes, we encounter situations where our Keurig coffee maker seems to behave unusually, and we wish to restore it to its original settings. Below, I present some methods to reset your Keurig coffee maker.
⚠️ Note: It’s important to highlight that these methods do not have official Keurig approval, and their effectiveness may vary depending on the model of coffee maker you have. Additionally, please be aware that any actions you take on your coffee maker are at your own risk, as I provide this information to assist you.
Method 1:
- Turn off the coffee maker and unplug it from the power source.
- Remove the water reservoir and leave the coffee maker unplugged for approximately 10 minutes.
- After 10 minutes, with the water reservoir still removed, plug in your Keurig again and press the power button.
- Wait for a few minutes until the coffee maker detects the absence of the water reservoir. The “add water” light will start flashing.
- Place the water reservoir back in its place and wait for the “add water” light to stop flashing.
- Once the coffee maker is ready to brew, open and close the coffee pod holder once.
With these steps, you will have reset your Keurig coffee maker, and it will be ready to brew coffee.
Method 2:
- Turn off the coffee maker.
- Unplug the machine from the power outlet.
- Press and hold the power button (do not release it yet).
- Plug the coffee maker back into the power outlet.
- Finally, release the power button.
This way, you will have completed the reset process for your Keurig coffee maker, and it will again be ready to brew delicious coffee.
Method 3:
For K-Compact models and “3-button models”. If all the lights on your Keurig coffee maker remain on and it doesn’t allow you to brew coffee:
- Ensure that the coffee pod holder is closed.
- Press and hold the power button.
- Press the small button.
- Press the medium button.
- Press the large button.
Permanent “add water” message or light on Keurig coffee maker
The message is clear: your Keurig doesn’t recognize the presence of water in the reservoir despite it being full. So, what’s happening?
In some way, your Keurig isn’t registering the water that’s undoubtedly in the reservoir. Therefore, you need to identify the source of the problem:
- Fill the Water Reservoir: Ensure the water reservoir is filled to the desired level. Sometimes, the light persists if the water level is too low.
- Remove the Water Filter: If you have a water filter in the reservoir, temporarily remove it. This will allow you to perform a pump purge.
- Pump Purge: Place the water reservoir into the coffee maker, and remove and reinsert the reservoir quickly about 20 times. This action will force water through the pipes and may release any trapped air bubbles.
- Inspect the Flow Meter: Inside your Keurig, a water sensor detects the water level in the reservoir. It can trigger the “Add water” light if it’s not functioning correctly.
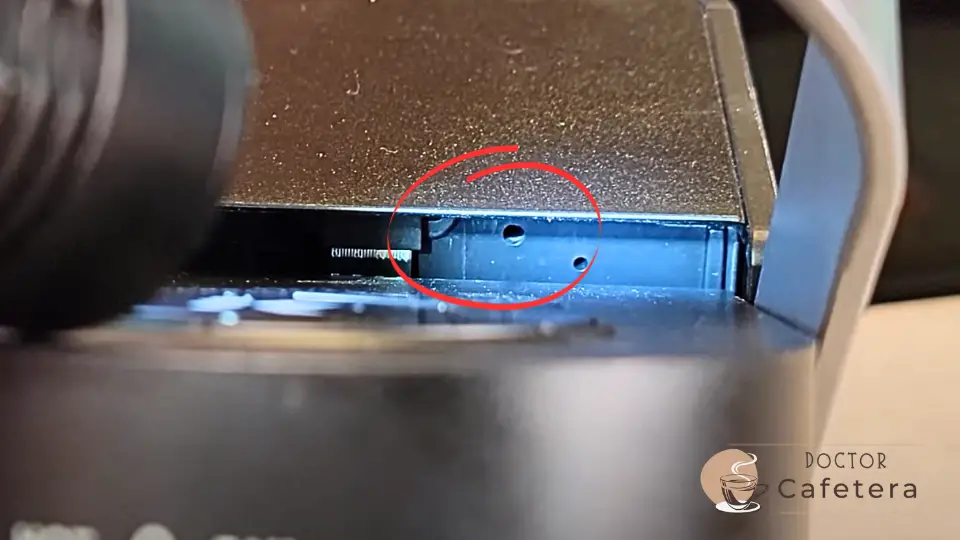
Here’s what you can do on a K-Supreme model:
- Partially close the lid of your Keurig to access the area behind it.
- Locate the small port behind the upper left corner when viewed from the front. This is where the sensor’s vent tube connects to the reservoir.
- Use a brush or a small vacuum to ensure this port is not blocked or obstructed. Clean any residue or dust that may be blocking it.
Reassemble and Test: After following the previous steps, reassemble your Keurig K Supreme and place the water reservoir in its position. Turn on the coffee maker and check if the “Add Water” light issue has been resolved.