To make the perfect coffee with a traditional espresso machine, it’s vital to follow specific and strict conditions. This includes a ratio of 1:2 – 1:2.5, a water pressure of 9 bars, and an extraction temperature between 197ºF and 205ºF within an extraction time of 25 to 30 seconds.
However, modern extraction methods, such as coffee pod or super-automatic machines, have modified these classic parameters to suit each technology. For example, coffee pod machines use smaller doses, finer grinds, and lower temperatures but with higher pressures.
How much pressure does a Nespresso machine use to extract coffee?
Nespresso coffee makers operate optimally within a pressure range of 15 bar ± 3 bar, thanks to their Ulka vibratory pumps. It’s important to note that these figures represent the pump’s capacity when it’s not under load. In practical use, the pressure fluctuates between 9 and 16 bar. This variation depends on the chosen coffee variety and the machine’s current condition.
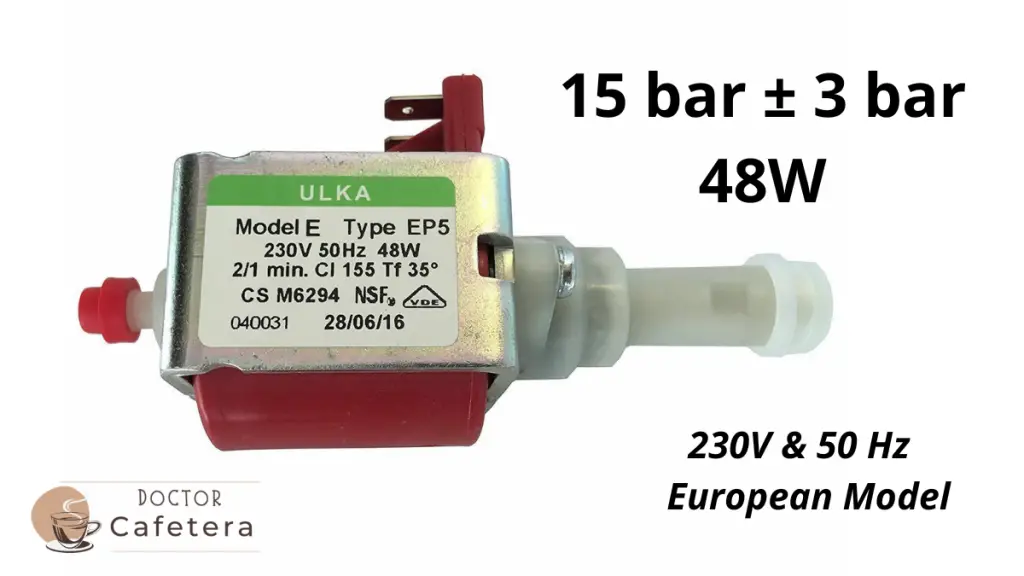
A pump performance below 9 bar during coffee brewing will result in a quality far from perfect.
Causes and solutions for a Nespresso losing pressure
The lack of pump pressure is closely linked to the loss of coffee volume in our cup, so the first symptom that our coffee maker is losing pressure is found in the coffee we get. This article discussed the coffee machine pouring too little coffee into the cup.
1. Reset your Nespresso
As we saw in that article, you must first ensure that the coffee maker is losing pressure and that it’s not just a subjective opinion. For this, you must reset the machine to the factory values, where you get a volume of 40ml for the espresso and 110ml for the lungo.
- Unplug the coffee maker.
- Hold down the lungo button.
- Plug in the Nespresso.
- Release the lungo button.
Once you have reset the coffee maker, prepare an espresso and a lungo, and check with any kitchen measurer or scale to see if your Nespresso pours less coffee. It is also important that you record on video with your phone how the coffee comes out for later comparisons.
Note: Very rarely will we find a Nespresso that suddenly increases water pressure; this would only happen in cases where we have connected our coffee maker to an incorrect power source, and therefore, we discard it as a problem of the machine and will not address it in this article.
2. Cleaning and Maintenance Issues Affect Pressure
The accumulation of limescale and impurities in the Nespresso is the main reason your machine does not brew coffees with enough pressure, so you should immediately perform one or several descaling processes.
Buy here the Nespresso descaling kit
After descaling, you can measure the amount of coffee you get again. You can do this by measuring the obtained coffee or recording another video and comparing it.
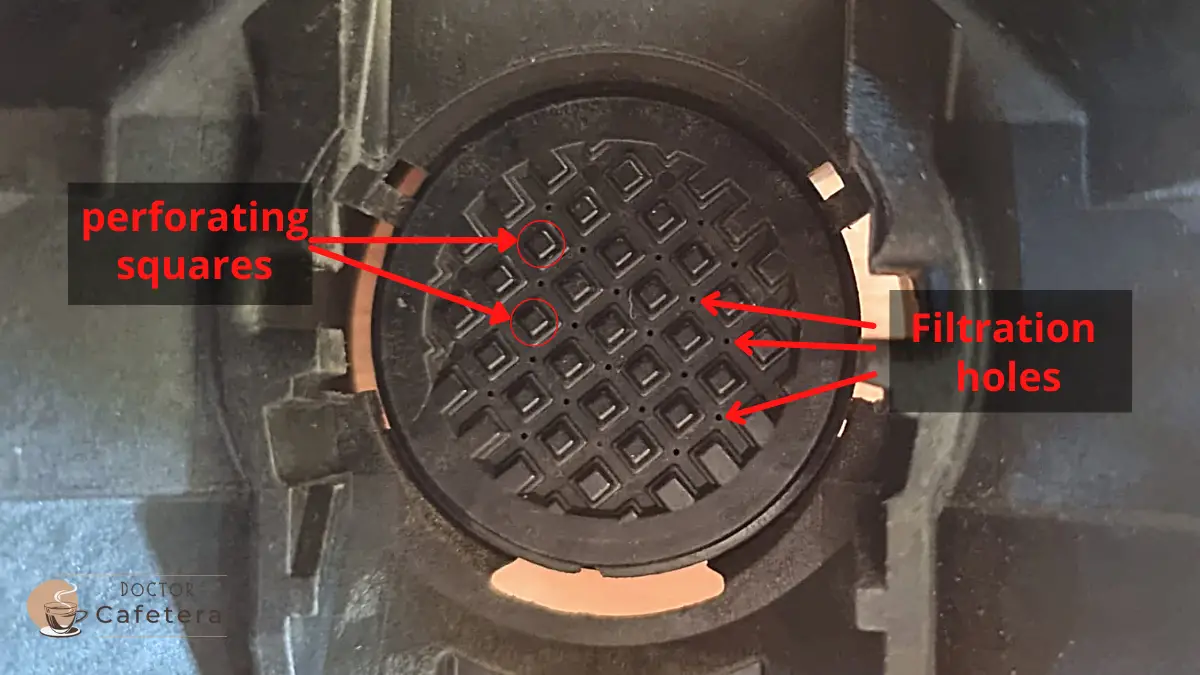
The next step in the cleaning and maintenance process involves cleaning the front perforating disc. Use a used toothbrush and clean water to scrub the disc until the brush looks clean. Occasionally, press the lungo button (without a coffee pod) to rinse.
It is most likely that after these two cleaning operations, the coffee maker has recovered the correct pressure, but if it did not, move on to the next section.
3. Use of compatible coffee pods
Opting for compatible pods to economize coffee preparation may not be the best option for your Nespresso. These coffee pods can cause short-term problems, and generally, the quality of the coffee they produce does not compare with that of the official pods.
A common problem with compatible pods is that they do not puncture properly. This prevents the water from flowing properly through the coffee, significantly reducing the extraction pressure and creating the impression of a failure in the Nespresso.
To verify if the low-pressure problem is due to the coffee pods, try using official ones and see if this resolves the situation.
4. Air intake problem in the Nespresso’s water circuit
Nespresso machines are relatively simple, without many pipes or valves. However, sometimes they can present problems. At each valve connection with a pipe, an O-ring can break over time.
A damaged or deformed O-ring can allow air to enter the water system, affecting the pressure during coffee brewing. To ensure everything works correctly, it is necessary to disassemble the Nespresso and make coffee tests without the casing to see if there is air intake.
Generally, if an O-ring is damaged, there will also be a water leak in that area. Therefore, it is important to be alert to any water leaks when the machine has pressure problems.
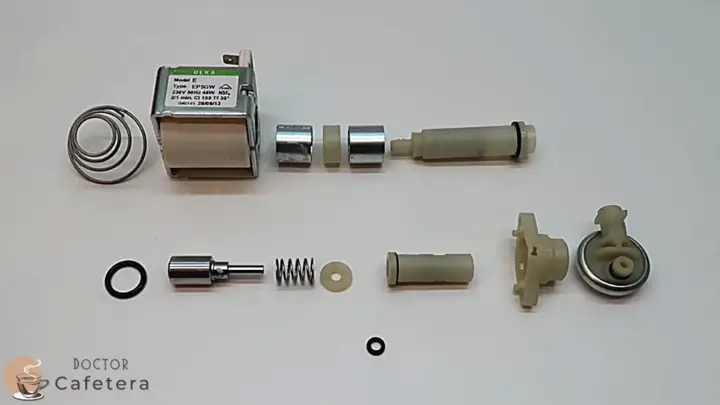
5. Problems with the Nespresso’s Water Pump
In some cases, neither descaling nor cleaning completely solves the low-pressure problems in the Nespresso, requiring a more detailed review focused on the pump. To carry out this diagnosis, it is necessary to disassemble the casing of the coffee maker to access the pump physically:
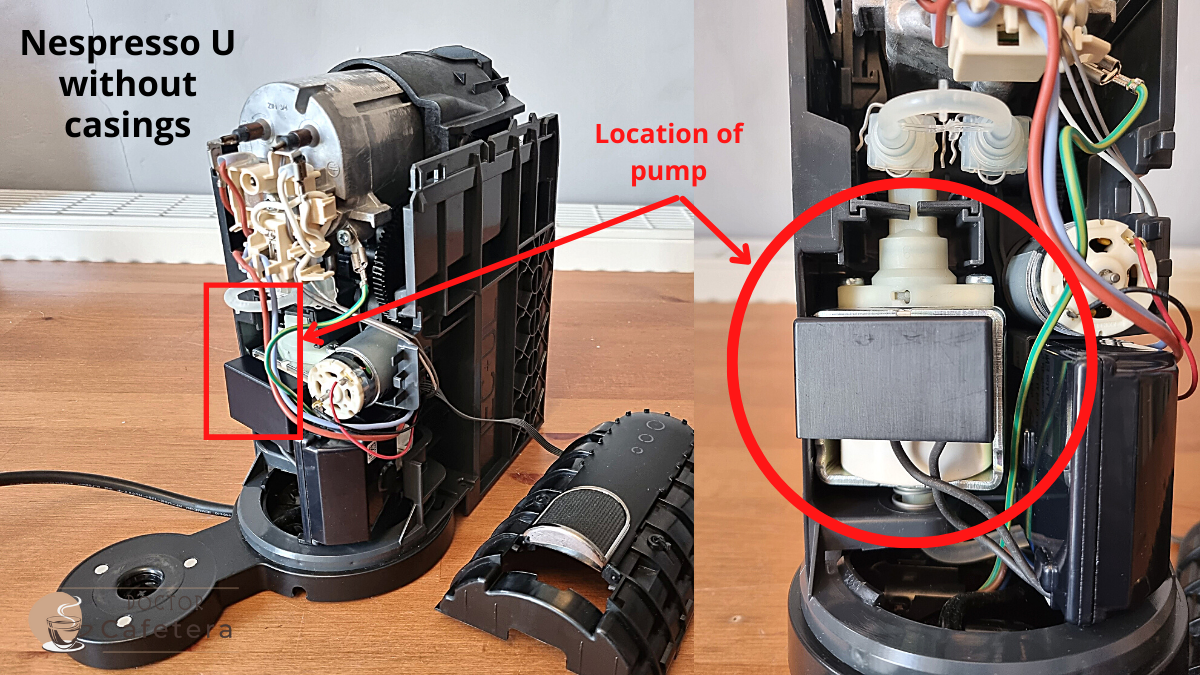
The first step is to conduct a visual inspection, checking for visible damage, rust, or discoloration on the pump. If we do not detect any problem at first glance, we can opt for two solutions: replace the pump with a new one or disassemble and clean the existing pump, replacing any O-rings that may be damaged.
- A new pump costs about £20 on Amazon; you have to note the characteristics of this and buy an equal one. You should also buy the metal clips in the image above unless you bend them to remove the pump and put them back in place. To remove these clips, they should be cut, in theory.
- You can disassemble it, check its parts, and clean them. Be very careful not to lose any parts and to assemble it correctly after maintenance:
6. Problem with the Control Board
Over the years, I have solved most pressure problems in Nespresso machines following the abovementioned four steps. However, it is important to note that I have encountered some cases where the machine still did not have the correct pressure despite cleaning or changing parts.
In these situations, the coffee maker magically recovered its pressure by replacing the control board with a new one. This is because the pump receives its power through the control board, and if it does not supply the correct voltage, the pump cannot generate the necessary pressure.
In these cases, the solution is to acquire a new control board.
Frequently asked questions
What causes low pressure in my Nespresso?
Low pressure is usually due to the accumulation of limescale and sediments in the internal conduits, obstruction of the front perforating filter, or problems in the water pump. The use of compatible coffee pods can also influence.
How can I solve the problem of low pressure in my Nespresso?
Start with a deep descaling and cleaning. If the problem persists, check and clean the front perforating disk, check the water pump, and see if there are obstructions in the pumping system. Also, make sure you are using compatible pods.
Is it necessary to replace the pump if my Nespresso has low pressure?
Not always. First, try to clean the coffee maker thoroughly, including a descaling. If cleaning does not solve the problem, consider replacing the pump.
How can I prevent pressure problems in my Nespresso?
Perform regular descaling and cleaning, and use filtered or bottled water. Proper maintenance can largely prevent breakdowns in the Nespresso.
What should I do if descaling does not improve the pressure of my Nespresso?
If descaling does not solve the problem, check for obstructions in the front filter or the hydraulic system. Finally, check the condition of the water pump.
How can I check if the pump of my Nespresso is working correctly?
You can identify problems in the pump if you notice low water pressure or variability in pressure. You can measure the voltage at the pump input during coffee preparation for a more detailed check. However, this is an advanced measurement that a professional should carry out.
Can compatible pods cause pressure problems in my Nespresso?
Yes, using compatible pods can affect the pressure in your Nespresso. If the pods are not punctured properly, the water cannot pass through the coffee, resulting in reduced extraction pressure.
➡️ Don’t miss my complete guide to solve problems with Nespresso machines.