The Swiss company Jura was founded in 1931 (over 90 years ago), manufacturing various small household appliances. In 1937, it produced its first coffee maker model based on the percolator principle, and by 1994, it was exclusively manufacturing bean-to-cup coffee machines and accessories for these machines.
We’re talking about 24 years for models like the Jura Impressa 500 or 20 years for the Jura Impressa E. Although Jura machines are known for their high quality, they are not exempt from problems, faults, and wear due to use.
In this article, we’ll look at the most common issues with a Jura machine. However, we’d like to point out that you can greatly reduce the risk of breakdowns by using your coffee machine correctly. Pay special attention to factors such as the quality of water and coffee you use, and keep it in a moisture-free environment.
How to clean the Jura machine
Many issues with Jura makers, if not most, stem from poor cleaning and maintenance. For this reason, we’ll show you how to perform the cleaning cycle of Jura coffee machines in the most suitable and effective manner.
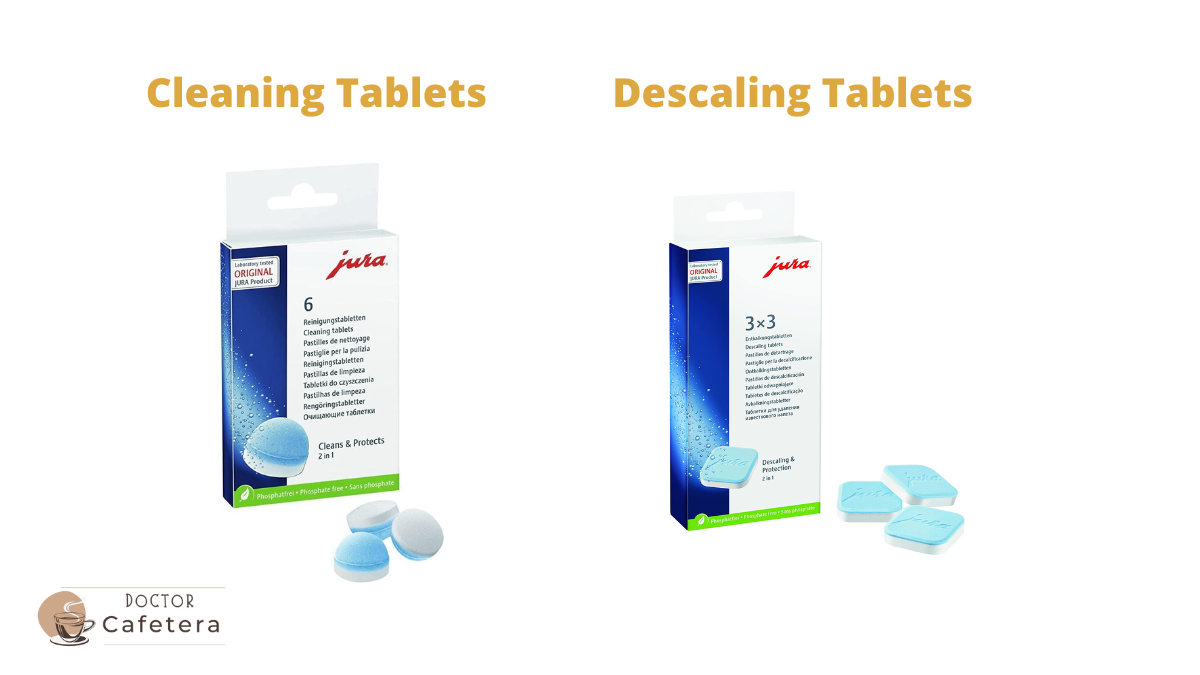
All you need to clean your Jura coffee machine are cleaning tablets or descalers; it’s recommended to use only original cleaning products to clean your coffee maker. Each manufacturer prepares their chemical blends based on the internal components of their coffee machines.
To explain how to clean, we’ve selected two of the most popular models of Jura coffee machines (Jura S8 and Jura D6) to serve as reference for descaling your coffee maker. You can use them as a basis if you have a similar model, as the procedure is almost always the same.
NOTE: Once you start the cleaning process, do not interrupt it, as it could damage the machine.
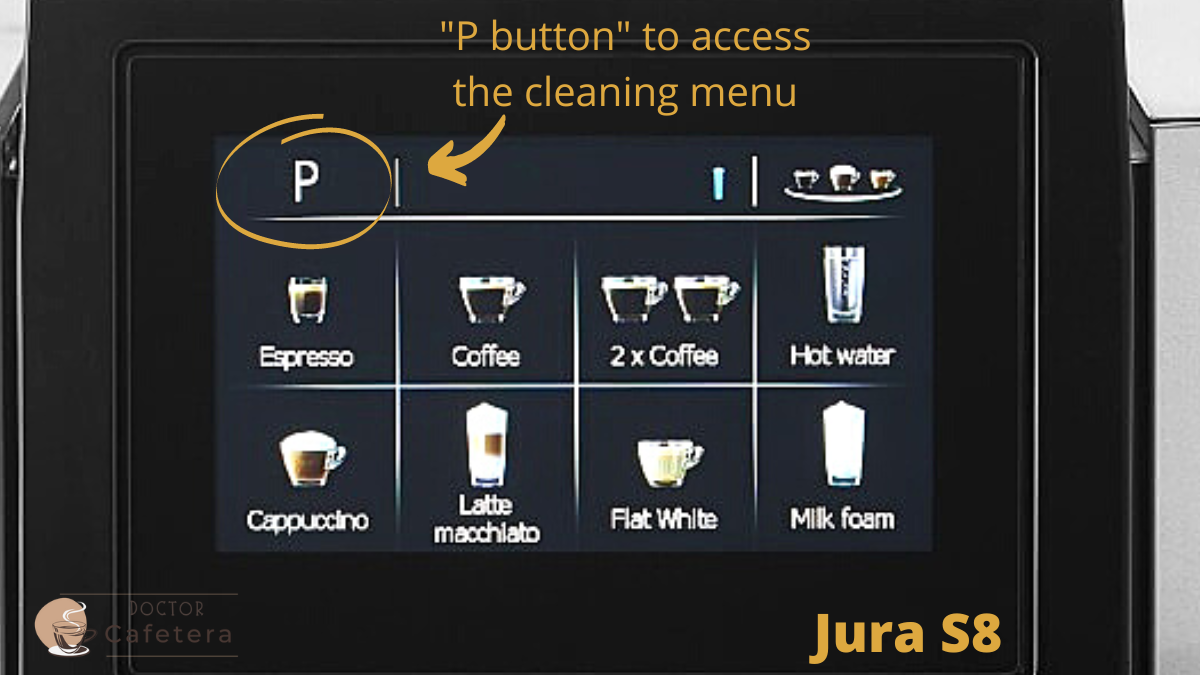
Automatic cleaning in Jura S8, with digital display:
Both Jura coffee machines with digital displays and those without will prompt you to descale the coffee maker every year and even tell you how much time is left for mandatory cleaning. However, you can descale whenever you want, before that date arrives.
Steps to follow for cleaning:
- Go to the menu on the digital display, usually by pressing the “P” button.
- From there, scroll through the options until you reach the cleaning menu and then go to the group cleaning menu, where you’ll also see an indicator of how much time is left until the next cleaning. Press there and you’ll get the time it will take the machine to clean (approximately 20 minutes, though it may be slightly less).
- Next, press the start button.
- After pressing the start button, the machine will prompt you to empty the waste container; once you’ve done that and the drip tray is also empty, put the pieces back in place. Then, place a jug to contain the water coming out of the machine. Press “Next”, and the machine will start its cycle, running some water through the pipes before asking for the cleaning tablet.
- The machine will then prompt you to add the cleaning tablet, which you should place in the tablet dispenser, close it, press “Next”, and the machine will do the rest.
Automatic cleaning in D6, without digital display:
The D6 coffee machines are slightly different because they do not have a digital display, so they have only a text interface, but the cleaning process is very similar.
Steps to follow for cleaning:
- Press and hold the “P” button to enter the menu.
- Go to “Rinse” in this menu and press the button.
- The first option that appears is “M-Rinse,” which means milk rinse, then “M-Clean” to clean the milk, then “Rinse” (skip all these), then “Clean”, where you should press the button.
- Now the coffee machine asks you to empty the drip tray, so you should remove it and make sure it is empty, do the same with the coffee residue container. When you have the coffee residue container and the drip tray empty, press the “Rinse” button (just before, place a container under the coffee outlet).
- First, a little water comes out, but then the machine will ask you for a cleaning tablet, so add the tablet, it’s the same one used in all Jura machines, and place it in the tablet dispenser. The D6 tablet dispenser is right at the top; you put the tablet there, press the “Rinse” button once more, and the machine will start the cleaning cycle, which can last at least 15 minutes.
At the end of the cleaning cycle on all models, the coffee machine will ask you to empty the residue container. That’s it. Your coffee machine is now completely clean and ready to use.
Why and how to descale a Jura maker
The entire water pumping system of the Jura coffee maker accumulates sediment and lime due to use. This calcification depends on the hardness of the water and can, in many cases, block the pipes, block the pump, or affect water heating. To ensure proper operation, descale your Jura coffee maker at least once a year.
Jura’s recommended descaling products (even if they are natural products like vinegar) may contain substances harmful to your appliance or leave residues that affect the taste of coffee. For this reason, we recommend that you use, if possible, Jura descaling tablets, specially manufactured for use in these machines.
Each Jura coffee machine is different, so it is recommended to consult the user manual in the maintenance section, as this procedure is performed on the specific model of your coffee machine.
My Jura maker foams milk poorly
If when frothing milk, the machine does not produce enough foam or the milk splashes outside of the frother, it may be a problem caused by lack of cleaning in the frother. Therefore, what you need to do is thoroughly clean the frother as follows:
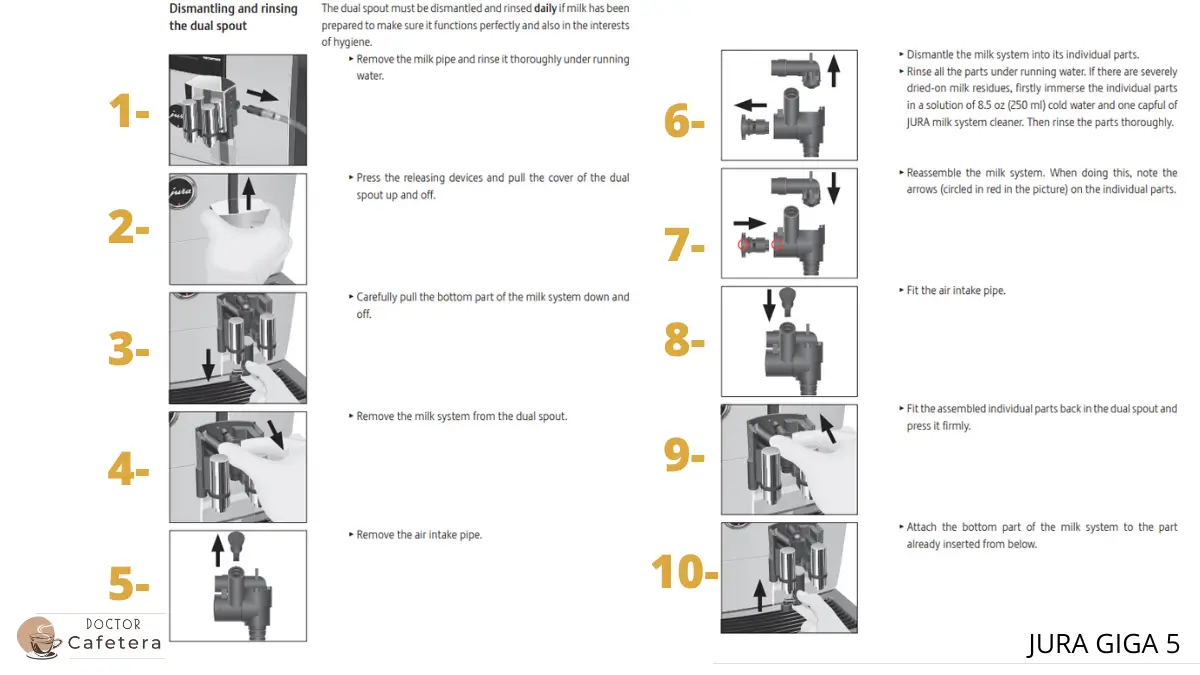
- Remove the milk tube and rinse it thoroughly under the tap, making sure water flows through the entire tube.
- Carefully remove the frother system from the coffee maker. Typically, this is done by pressing both sides of the frother at the same time.
- Disassemble all individual components of the frother.
- Rinse all parts thoroughly under the tap. If there are persistent milk residues, soak the components first in a solution of cold water and a little dishwashing soap.
- Reassemble all frother parts.
Here is a video explaining how to do it:
As each coffee maker model is different, we recommend again that you consult the user manual of your coffee maker to perform this procedure correctly. Below is an example of how to disassemble the frother of the GIGA 5, which has dual outlets:
My Jura maker does not brew enough coffee
If you have a Jura maker and during brewing you notice that the coffee only drips out, it may be a problem because the coffee has been ground too finely and is clogging the coffee extraction system. In this case, try adjusting the grind to a coarser one in the grinder, as described below.
Please note that if you adjust the grind with the grinder mechanism stopped, damage to the rotary selector may occur. Therefore, we recommend adjusting the grinding position only when the grinder mechanism is running.
- Place a cup under the coffee outlet.
- Open the cover of the rotary selector to adjust the grind consistency.
- Select the type of coffee preparation. For example, press the “Espresso” button to start preparation.
- Turn the grinder adjustment knob to the desired setting (coarser than the current one) while the grinder is running. The pre-set amount of water flows into the cup. The preparation stops automatically.
- Close the rotary selector cover to adjust the grind consistency.
If you have already adjusted the grinding parameters but the problem persists, it is probably because the machine is clogged with lime; in this case, perform a descaling following the step-by-step instructions from the previous section.
No water comes out of my Jura maker
If no water or steam comes out of the nozzles of your Jura coffee maker and you can barely hear the sound of the water pump, you should pay attention to the connection part of the nozzles to the coffee maker, as it may be obstructed by milk residues or lime particles that have come loose during a previous descaling.
To solve this problem, follow these steps:
- Remove the nozzles from the coffee maker.
- Unscrew the black connector through the hexagonal hole of the ground coffee measuring spoon.
- Clean the connector thoroughly.
- Screw the connector back in by hand.
- Tighten it carefully with the hexagonal hole of the measuring spoon no more than a quarter turn.
How to replace the water pump of the Jura maker
The water pump is an essential part for the proper operation of an espresso coffee maker. If it fails or starts running with less pressure than it should, there will be no coffee, or at least not with the quality we expect from a real espresso.
So if you have this problem, here’s how to change the electric pump to fix it. This procedure will take you about 25 minutes, and you will need the following tools:
- Torx
- Screwdriver
- Pliers
- Replacement pump
Step-by-step procedure:
- Turn off and unplug the coffee maker.
- First, separate the parts of the machine that you can remove manually.
- Loosen the screws on the back and also those on the front.
- With the help of a flathead screwdriver, remove the upper housing and remove the other casings.
- Locate the pump and loosen the tubes and cables connected to the pump.
- Replace the pump with a new one and reconnect each of the tubes and cables that were removed.
- Next, we proceed to reassemble each of the pieces that we had removed. While we put the back cover back on, we must make sure to reposition the drain tube of the pump on the side of the coffee maker.
With the following video, all possible doubts will be solved. You will learn how to replace the water pump of your Jura coffee maker without any problems:
You may be interested in: