In this new article, I will show you the best way to froth milk at home to create an exquisite coffee. This information will be useful for all those who prepare coffee at home without a steam wand espresso maker and want to achieve a texture similar to coffee shop coffees.
Any type of coffee maker that produces pressure, such as espresso machines, moka pots, or capsule coffee makers, can be used for cappuccinos, flat white, or lattes. But this information will be ideal for those who opt for a manual espresso machine, such as a Flair. These coffee makers are highly recommended for those who want to get started in the espresso world and do not have a big budget.
In this article, we will see the best way to texturize milk with 3 different methods, which many of you have at home. I am referring to the manual battery-operated frothers, the electric Aeroccino-type frothers, and the french press. I will give you the best tips to improve your technique with each method.
What do you need to use a milk frother?
Let’s start with the basics. The essentials for using a milk frother are the following:
- Milk. This can be of any type, even vegetable, but with whole cow’s milk, we have better results because of the amount of fat.
- A kitchen thermometer. It is not essential, but we will get better results if we can monitor the milk when we heat it.
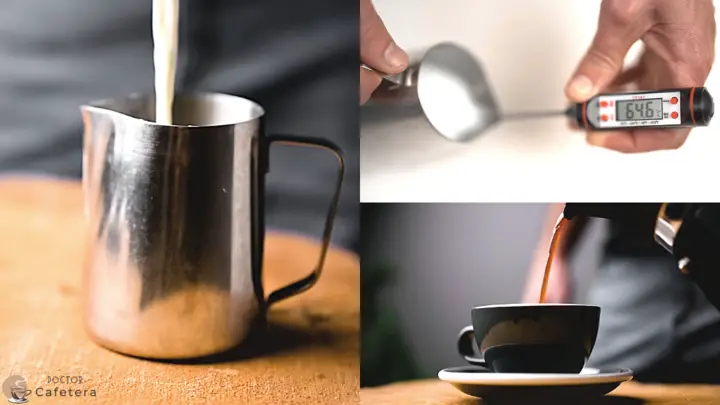
- A milk pitcher. It is optional if you want to try to make latte art.
- Espresso coffee. For this article, I used the Flair Neo.
What are the different types of milk frothers that exist?
There are only two types of milk frothers; manual battery-operated frothers and electric frothers, although you can also froth milk with a french press. Below, I will tell you about the advantages and disadvantages of each.
Battery-operated milk frothers
Advantages of the battery-operated frother
- This is the most economical of all and is found everywhere. It has a small whisk on the tip that rotates, and all we can do is turn it on and off; it has no extra function.
- By frothing by hand, we have a little more control in deciding how much air we want to add to the milk and how to position it, which will be key to achieving a good texture.
- You can use it with as much milk as you want.
- It is very easy to clean.
Disadvantages of the battery-operated frother
- We need to heat the milk beforehand. I use the microwave and leave it for about 1 minute and 10 seconds, which is what I need to reach 149 ºF. If you have a thermometer, check this.
Note: Above 149ºF, the chemical structure of the milk breaks down, and not only does it take on an unpleasant taste, but the froth becomes much denser and drier, separating from the liquid.
Step by step to froth milk with a battery-operated frother
- Once we preheat the milk, we transfer it to the jug.
- We will turn on the frother on the surface of the milk and leave it there for about 2 or 3 seconds to add a little air to the milk.
- Then, we submerge it underneath (at a 45° angle) to create the whirlpool we need for the bubbles to mix with the liquid. We stay a little while in this position until we reach the desired texture; this happens after about 1 minute.
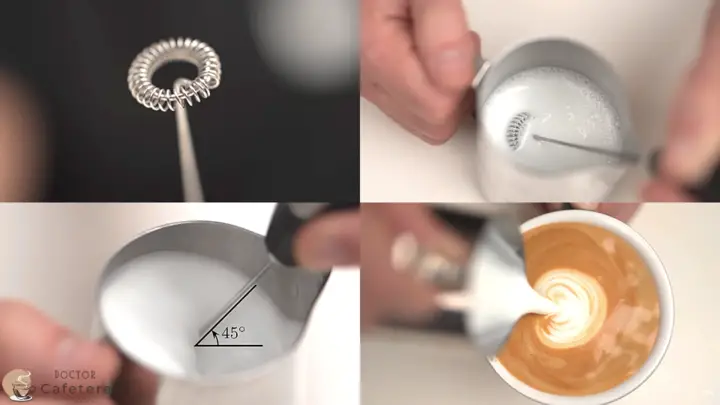
The texture obtained will surprise you as the results are similar to those obtained with a steam lance. But be careful because sometimes you can create too much froth without almost realizing it. The key is not to stay too long on the surface.
Electric milk frother
This frother is very common among those who have capsule machines, as they are always sold in combo with these (Nespresso – Aeroccino). It is very similar to the battery-powered whisk but completely automatic, without having to do anything more than put the milk in it, not even heat it since the device itself does it.
Advantages of the electric frother
- The biggest advantage is that you don’t have to heat the milk beforehand; the temperature it reaches is just right for frothing milk. According to my tests, it heats from 149ºF to a maximum of 158ºF and does it quite fast. Some models do it just past a minute and a half, although I have tried some cheaper ones, and they have taken up to 3 minutes.
- Cleanup is fairly easy and quick.
Disadvantages of the electric frother
- The biggest disadvantage is their cost; they are much more expensive than battery-operated frothers. The cheapest ones are ten times more expensive than the battery ones.
- They usually have very low capacity. My Aeroccino has a capacity of 120 milliliters for frothing and 240 milliliters for the non-frothing hot milk function.
- It doesn’t allow us any control, and there’s not much we can do about the froth it produces; sometimes, it creates too much.
And can anything be done about this froth? Well, you can spoon off a little bit and mix the rest well and use it, but it’s not ideal. It’s not of very good quality to be able to make latte art; it’s not silky or stable.
Comparison of the battery and electric frother with the french press
Comparing these two frothers with the french press, with which I already taught you how to texturize milk and the perfect technique to do it, I can say that the french press has the following advantages and disadvantages compared to these frothers:
Advantages of frothing with the french press
- You can buy a french press anywhere, in supermarkets, bazaars, or online stores, and always at a very good price.
- Apart from frothing milk, you can do many other things: make coffee, Cold Brew, tea, infusions, and more.
- The capacity will depend on the press size, so it is quite flexible too.
Disadvantages of frothing with a french press
- One downside is that you have to heat the milk beforehand.
- And clean-up is the least convenient of the 3 options, although it’s not too tedious either.
How to froth milk with the french press
The step by step to froth milk with the french press you can find in detail in the article I mentioned, but here I leave you a small summary:
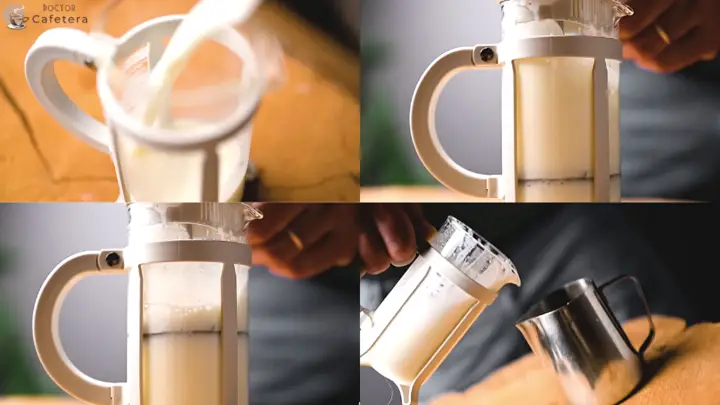
We must carry out three long pulses and stay almost a minute pressing below the surface of the milk, which mixes it and gives it the texture.
This texture that it produces seems impeccable; you can achieve very good latte art; the milk is silky and creamy, with this perfect texture that makes the coffee much richer.
The key here is the metal mesh, with such small holes, that creates the perfect micro-bubbles, very similar to the vaporizer of a machine.
Which option do I recommend between the two types of frothers and the french press?
The french press would be the best option in my experience; it achieves a perfect texture at a low price.
- If you already have a battery-operated frother at home, try what I mentioned here, and you will get a pretty good texture. It’s not quite the same as the french press, but it’s an excellent option without spending money.
- And if you want something more automatic without having to pre-heat the milk and what matters most to you is convenience, then I would go for an electric frother. You would simply have to accept that latte art is almost out of the question, and the coffee will not be as tasty as it could be. It’s up to each individual’s needs.